I write a lot of code. I write a lot of code using Actor-Based languages like Erlang / Elixir and Pony.
I spend the vast majority of my time in the Pony ecosystem, but there is one thing from the BEAM that I truly miss. I miss being able to “shell into” running applications in order to do debugging and introspection. Pony’s runtime does not have that, but there is no reason why we can’t create a package that can do a subset of it.
To achieve this we need two things:
- A secure way to connect - ponyssh
- Some way of interacting with the instrumentation - Missing.
What we need is a framework that we can use to provide a User Interface via a Terminal. A Text-based User Interface, or TUI if you like.
EquesTUIa is a pure Pony TUI library I’ve been building to meet that need. It gives you a widget toolkit, a layout engine, a DSL for declaring your interface, and a compositor that figures out the minimum number of screen writes needed to update your display. No C dependencies. No FFI. Just Pure Concurrent Performant Pony.
Before we talk about the library specifics, let’s talk about why TUIs are such a minefield to build, and why Pony’s concurrency model actually makes it a lot easier.
What’s a TUI?
A Text-Based User Interface is an interactive interface inside your terminal that behaves like a GUI. Instead of just printing lines of text and waiting for line-based responses, a TUI takes over the whole screen. It draws boxes, handles mouse clicks, responds to keypresses in real time, and redraws itself when things change. Think htop or vim as opposed to your shell.
You’re no longer writing lines, you’re painting a screen. Character by character, frame by frame.
The Good Old Days
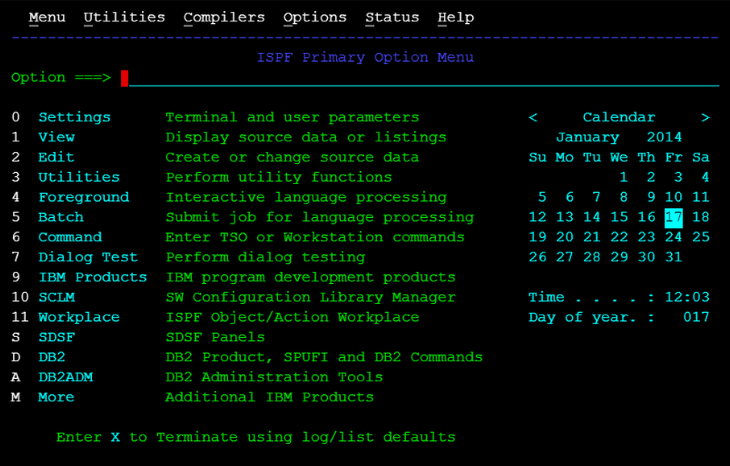
TUIs used to be trivial. IBM built their empire on an 80x24 row/col standard. Everything from Taxes to Bank Transactions to Airplane Bookings were almost all exclusively done via 80x24 forms to mainframe.
Building a TUI for a fixed-size screen is easy. You know the size. You know the positions. You put your data where it goes. Done.
Breaking Your TUI With This One Neat Trick
Modern users can resize their terminals.
If a user expands their window and you haven’t considered resizing, your best case scenario is that your application looks ugly and wasteful, squashed into the top left 80x24 characters of a much larger screen. Worst case, you end up with a corrupt and jumbled mess as text wraps and overwrites in places where it shouldn’t. If the user shrinks their terminal smaller than 80x24 then you’re guaranteed a bad time.
And it’s not just manual resizing. Terminal multiplexers like tmux and screen split panes to arbitrary sizes. Tiling window managers resize windows constantly. Your application might start at 200x50 and find itself at 40x12 five seconds later because the user opened a second pane.
This is the central problem of modern TUI development: you cannot know the size of your screen ahead of time, and it can change at any moment. Once you soberly recognize this, you have to abandon absolute coördinates and sizes. You need to design around resize behaviour — and that’s exactly what equesTUIa is built to do.
Why Pony Needs Its Own TUI Library
The Pony Standard Library has limited terminal support. The term package lets you colour your text and prompt your user for line-based input. That’s it.
Yes, we could (and we have) ported existing TUI libraries from C, but a pure Pony implementation not only removes an additional dependency, it also makes it far easier for users to extend the functionality. And as we’ll see, Pony’s actor model gives us something that C TUI libraries simply don’t have.
Stuck In The Middle With You…
In EquesTUIa, our terminal screen consists of an arbitrarily-sized two dimensional array of characters. The characters are no longer limited to monochrome 8 bit ascii, so each location in our Grid consists of a Cell which includes a unicode encoding, foreground colour, background colour, character width, and other misc attributes.
The fundamental functionality of our application is to store an Application State, receive Input that may mutate this state, and redraw the entire “screen” (aka, Grid) if necessary. EquesTUIa handles reducing your Grid to the minimum number of changes required to update the display.
sequenceDiagram

    box rgb(255,182,193,0.2) equesTUIa
        actor User
        participant InputActor
    end
    participant YourApplication
    box rgb(255,182,193,0.2) equesTUIa
        participant Compositor
        participant Screen
    end

    User->>InputActor: Keypress, Mouse
action, or resize.
    InputActor->>YourApplication: Input Action
    activate YourApplication
    Note over YourApplication: Renders Application State
into character array (Grid).
    YourApplication->>Compositor: Grid Data Sent
    deactivate YourApplication
    activate Compositor
    Note over Compositor: Calculates Differences
between the received
Grid and the previous
Grid, and expresses them
as a minimum number of
screen writes.
    Compositor->>Screen: Send only diffs
    deactivate Compositor
NOTE The data only flows in one direction.
fun render(app: AppState): Grid
The phrase “Renders Application State into character array (Grid)” does a lot of heavy lifting. It means you are responsible for deciding where every character on the screen should be positioned.
You don’t have to do all that work by yourself (unless you want to), as EquesTUIa provides a library of common display primitives (or widgets) such as labels, framed boxes, text boxes with wrapped-text etc… However, the widgets that will save you the most time by far are the containers. Containers are widgets that allow you to define the structure of your display and how it should behave when the screen is resized.
Containers and Trees
The single biggest “ah-ha!” moment I had during the design was this. Before your application can render its Grid, it needs to know what size the grid is. If your application consists of a row of buttons, those buttons need to know how much space they have to render themselves. There is beautiful symmetry here if you consider the space allocated to each button as being its own little “screen”.
Enter the HBox and VBox. These containers allow you to stack an arbitrary number of widgets in a Horizontal or Vertical direction and specify how they should behave.
So, we define our TUI as a tree of widgets in containers.
When the application starts, or the window is resized, the screen tells the root widget in the tree the size of the screen. That widget then looks at all of its children, does Math™ to allocate the Correct™ amount of space for each of its children, and so on all the way to the leaves.
A “Label” or a “TextBox” doesn’t know its own size at startup because it does not know the size of its universe. It is told by the container that it is in.
If this sounds complex, we have a few ways to make it easier. First up, we have a DSL which you can use to define all your widgets, where they are placed relative to each other, and critically, how they behave on resize.
In this example you can see how two buttons render when on a small screen, and how they render when that screen is widened. “fixed” / “expand” / “fill” for size allocation, “beginning”, “center”, “end” for alignment.
hbox
  pack-start 7x3 fixed
    frame *x3
      label "fixed"
  pack-start 8x3 expand align=center
    frame *x3
      label "expand"
  pack-start 6x3 fill
    frame *x3
      label "fill"
How the buttons look in a small window: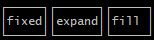
… and after they’re expanded:
Wiring It Up
There is very little ceremony required to instantiate your TUI model as defined by the DSL. Just enough to specify the inputs and outputs:
actor Main
  new create(env: Env) =>
    let output = StdoutOutput(env.out)
    let input = StdinInput(env)

    (let term_w, let term_h) = TermSize()
    let compositor = Compositor(output, term_w, term_h)
    let input_actor = InputActor(input, compositor)

    let builder = UIBuilder(compositor, input_actor)

    match builder.build( /* your DSL here */ )
    | let root: Widget tag =>
      compositor.register_root(root)
      root.resize(term_w, term_h)
    | let e: BuilderError =>
      env.out.print("Builder error: " + e.string())
    end
Of course, if you prefer you can define your application directly with imperative commands:
let vbox = VBox(compositor)
let label = Label(vbox, "Hello", Green)
vbox.pack_start(label, 80, 1)
compositor.register_root(vbox)
vbox.resize(term_w, term_h)
All Widgets are Actors by Default
Where we diverge from almost every other TUI is that we treat all widgets as actors which makes implementing your own absolutely trivial.
The core abstraction is the Widget trait:
trait tag Widget
  fun ref state(): WidgetState
  fun ref render(): Grid

  be resize(w: USize, h: USize)
  be trigger_render()
  be receive_key(key: KeyEvent)
  be receive_focus()
  be receive_blur()
The only functions you are required to implement are state() and render(). Everything else has sensible defaults which handle the complexity for you.
Since Grid is val, it’s freely sendable between actors with zero copying cost.
In a later post I will demonstrate how to build your own widgets which YES, can be used in the DSL as the UI Builder allows you to register your own Widget Actors.
Current State
EquesTUIa is usable today. The widget set includes Label, TextBox, Frame, HBox, VBox, HLine, VLine, and Canvas. The DSL parser and builder have 100% support for all of the widget library and, also allows you to register your own widgets in the DSL!
EquesTUIa has no dependencies.
If there is some app you think would make a good demo-app, feel free to share!
Repository: github.com/contact-red/equestuia